Stampin' Up DBWS and Blog

**** Link to my Stampin' Up website to order on-line, see current promotions, and see the schedule of events.
http//www.stampinfunwithlynne.stampinup.net


Visit, like and share my facebook page for more fun stamping information:
Lynne Peters, Independent Stampin' Up Demonstrator


I am having issues posting the mini and Sale-a-bration catalogs and their links to the right hand side. Please visit my website to view the catalogs. Thank you.

Friday, June 29, 2018

FUN FOLD FRIDAY

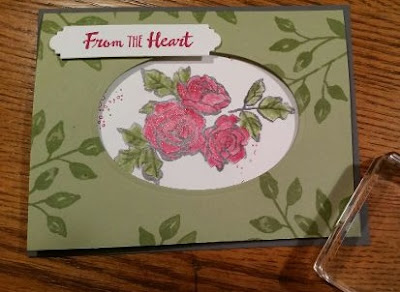
Today's card was inspired by Jackie Bolhuis.  I used a different stamp set and also turned my card in the horizontal position instead of vertical.  I wanted to use my new Lovely Lipstick ink color so I checked out the new Color Coach to help me with coordinating colors.
Wednesday's post gave you a link to the Color Coach.

Ignore the stamping block at the corner.  I needed something to keep the card closed while I took the picture.  I used Basic Gray and Pear Pizzazz ink and card stock and Lovely Lipstick and Pear Pizzazz ink for the coloring.  I did the coloring by squeezing my ink pad to get some ink on the lid and then dipping my Blender pen in to get the color.
The stamp set I used was Petal Palette.

Here are a few more pictures of the inside and some tips for you when creating yours.
Card base: 5 1/2 x 4 1/4
Pear Pizzazz: 8 x 5 1/4, scored at 4"
Whisper White:  7 1/2 x 5, scored at 3 3/4"

Cut out an oval in the center of your green piece using the Oval Framelits.

Attach your green piece to your gray piece and your white piece to your green piece.  I let my white open at the top so it would fold down to open, but you could also have it open at the bottom so you would lift it up.
I closed the card and traced around the inside of the cut out oval so that my oval shape would be on my white piece.  That way I knew where I need to place my stamp.  Then I erased the light pencil line.

Here is the inside:

I hope you will be inspired to try this easy fun fold.


Wednesday, June 27, 2018

WEDNESDAY

Today's card uses the other stamp in the Bokeh Dots stamp set.  This shows a different way to use the background.

The best way to stamp this image is to cut out your circles first.  I used the Layering Circles Framlits.  Then stamp on top of your circle.  If you stamp the stamp first and then try to cut out the die image, you will be wasting paper.  I covered each one of the circles and the embossed images with Wink of Stella, but it is hard to see here.  The stamped image remined me of sparkles so I thought it needed some bling.

For this project I chose Balmy Blue, Highland Heather and Granny Apple Green as my color combo.  Stampin' Up has come out with a Color Coach chart that shows you what colors look nice together.  I LOVE it.  You can also create color combinations of your own on a blank chart.  Here is the chart for all the core colors and one for the In Colors.  Have fun using it. 
Here is the blank chart for core colors.  Also here for the In Colors.

Monday, June 25, 2018

MONDAY

It seems like I always need a get well or thinking of you card so that is what today's card is.  I wanted to use a new color and stamp set.  Here is my card for the day.


I used the new Granny Apple Green color and it is SO pretty.  The stamp set is Bokeh Dots which has two small background stamps - very cool.  I also used Love What you Do stamp set for the flowers and Healing Hugs for the message.  I added the adhesive backed Basic Sequins (pg 198) for a little extra touch. They are shimmery and add a nice little bling to any project.  This card was so easy.  I love when you can make a simple yet elegant card!

Friday, June 22, 2018

FUN FOLD FRIDAY

I saved this idea that I saw earlier on Pinterest.  The original creating and my inspiration came from Kelly Acheson.  This is a very easy fold to do and can be used for anything.


Here are the dimensions:
Base (Balmy Blue) 5 1/2 x 4 1/4
Balmy Blue strip 4 1/4 x 1, scored at 1 1/2
DSP strips (retired) 5 1/2 x 1/2.  You can cut these to be 1/4 instead of 1/2 if you want.  
Whisper White 2 7/8 x 11 scored at 5 1/2.
Scraps for message

Stamps: Healing Hugs, Painted Glass (message), Amazing Artisan
Ink:  Flirty Flamingo, Balmy Blue, Pear Pizzazz
Stitched Framelits, Layering Ovals

Glue your DSP strips to the sides of the card.
Glue the back of the white strip to the base.
Put adhesive on the small folded end of the Balmy Blue strip, bring around to the front and add your Big Shot pieces with the message.


Wednesday, June 20, 2018

WEDNESDAY

Today I am sharing another card using the new Embossing Mat, using the Petal Palette stamp set and matching thinlits.

In the corner I did just the embossing as I did in Monday's card.  Today I did the leaves by cutting first with the Big Shot and then embossing.  Follow Monday's video link to show how to put the sandwich together to do both steps.  

Here is a close up of the leaves.  When you cut and then emboss, you get all the little spaces that are not popped up by just cutting.  Such a cool effect.  I will be trying more of these with different framelits/thinlits.
Supplies for the card:
Sea foam (new) background card stock, Garden Green, Balmy Blue (new).
Petal Palette and Painted Window (for words) stamp sets.
Garden Green and Momento ink pads.
Retired doilies and black jewel


Monday, June 18, 2018

MONDAY

I wanted to play with the new Embossing Mat today so here is a simple card using the new product.


If you look closely you can see the embossed outline of the flowers and then the embossing at the bottom.  I used the Petal Palette stamp set and thinlits to do this technique. the message is from the Rooted in Nature set.

At the end of this post is a link to the Stampin' Up video for using your new Embossing Mat.  You can use it several ways which is always a plus!

I stamped my flowers first and then I laid the matching framelit around the flowers, secured with a little Washi Tape to keep it in place.
Turn this upside down on your Big shot platform following the directions in the video. This picture shows you what it looks like after it has gone through the Big Shot.  Sorry for the blur, but I think you get the picture.
I colored it with Stampin' Blends, which will soon be coming to the Stampin' Up warehouse - there has been a little delay. 
To get the embossing at the bottom of the card, lay your framelit under your card stock, cutting edge up, and follow the platform sequence directions.
I love how this turned out - very easy.

Here is the link to the video.  
There are also other videos on Pinterest produced by fellow demonstrators.  I will show you a couple more samples later in the week.

Visit and like my fb page Lynne Peters, Independent Stampin' Up Demonstrator to see a new post each day of the week.


Friday, June 15, 2018

FUN FOLD FRIDAY

Finally sharing the corner fold card I did for our stamp fest last weekend.  Using Rooted in Nature once again.  Can't wait to get a few more new stamps on Monday.

Crumb Cake, Night of Navy, Shaded Spruce card stock; Shaded Spruce and Night of Navy Ink; Rooted in Nature stamp set and framelits; Dazzling Diamonds; retired Enamel Shapes.

Although it seems like this fold would be hard, it is not.  Here is a video by Sage Kimble, the Mad Stamper, that shows you exactly how to make your cuts - really very easy.

Wednesday, June 13, 2018

WEDNESDAY

Trying to get back in gear and regular Mon, Wed and Fri posts.  Things have just been busy. I don't have a lot of new stamp sets, but I was still playing with the Rooted In Nature set.  Here is another simple card I came up with.

Supplies:  Vanilla, Night of Navy, Crumb Cake card stock, Triple Banner Punch, Woodgrain Embossing Folder, Crumb Cake and Shaded Spruce (NEW) ink, Metallic Pearls, Layering Ovals Framelits.
I stamped off the double tree in the background and then stamped the single tree and cut it out with the matching framelit.  I also stamped off the log rings in the background.

The new catalog is amazing!  Let me know if you need one and I will be sure to get one to you. I will include a wish list sheet because you are going to want it all, and a coupon for a FREE pack of Metallic pearls with a $50 order by July 31. There are a lot of new colors, some of our old favorites returning.  Here is a link to the new and returning colors and the reorganization of the color families.
If you don't want to wait until you get your catalog you can go here and download the catalog so you can see how the wonderful products.