Stampin' Up DBWS and Blog

**** Link to my Stampin' Up website to order on-line, see current promotions, and see the schedule of events.
http//www.stampinfunwithlynne.stampinup.net


Visit, like and share my facebook page for more fun stamping information:
Lynne Peters, Independent Stampin' Up Demonstrator


I am having issues posting the mini and Sale-a-bration catalogs and their links to the right hand side. Please visit my website to view the catalogs. Thank you.

Friday, August 31, 2018

FUN FOLD FRIDAY

Today's fun fold is a cute little box inspired by a Pinterest post from the website www.craftingwithlouisa.com.   I made these little boxes and filled them with candy.  I will be using them as little pillow gifts for the girls I go to the beach with in September.


I used the Colorful Seasons products from pg 161 of the AC - a GREAT set!

Here are the directions and cuttings for the box.  Sorry this is so small, but when I try to enlarge it it becomes blurry.
Card stock measures 9 1/2 x 4.  
Score on the long side at 3-4-7-8.
Score on the short side at 1 & 3.
Burnish all scores.  Cut away the two large sections at the top of the cardstock and round the edges of the flap with the new Detailed Trio punch (pg 211  of AC).
It is hard to see, but the words say DSP on all the sections EXCEPT put Tombow adhesive or Fast Fuse on the two small flaps and the two side flaps at the top of the picture.
Then just bring your pieces together to adhere and form your box.

DSP pieces measure:
1 3/4 x 2 3/4 (2)
3/4 x 2 3/4 (2)
3/4 x 1 3/4 (1)
1 1/4 x 1 3/4 (1) round 2 of the corners to match the box .
Cardstock layer for stamping: 1 1/2 x 2 1/2 


Here is a video by Louisa.  I found it a little long so I hope my directions will help, but you can check out the video if you are stuck.  She brought her flap to the front.  I tucked mine inside because I wanted to have room to stamp my image.

Today is the last day to order your Blended Seasons Bundle.  Also this is the last day to place your order and take advantage of Bonus Days.  For each $50 ordered, you will receive a $5 Coupon Code to use in September.  DON'T MISS OUT!


Wednesday, August 29, 2018

WEDNESDAY

I needed a simple card in a hurry and was inspired by a card I saw on Pinterest by Stacey Krats.  I used the Petal Palette stamp set for this card.

To make the background on the left side of the card I simply inked the Clear Block I directly with the ink pads.  I used the new Petal Pink and Sea Foam.  I really like the Petal Pink color but I have to admit I don't think it is very Pink.  It's almost like a light Calypso Coral.

I also used the Stitched Framelits and the Oval Framlits.  The happy birthday message is from a retired set and the cord is also an old Sale-a-bration item.  Sequins can be found on pg 198 of the AC and have a self adhesive back.  I LOVE these sequins!

The technique for this card can be used with lots of stamp sets.  Try your favorite and see how it turns out.

Monday, August 27, 2018

MONDAY

I'm back - new phone and ready to take more pics.  Today's card features the Blended Seasons Bundle.  First the card and then I will talk about the framelits included in the bundle.


This card uses the wheat stamp included in the stamp set, colored with Early Espresso and Crushed Curry Stampin' Write Markers.
The flowers and the bow are made with the thinlits in the Bundle.  The Cajun Craze frame in the middle was made using the framelits.  You can use the negative or positive image.  When you cut out the framelit, you will have an inside piece that you can also use on a card.  And look at the "stitching" on each of the pieces.  So cool.  This is the smallest frame.  There are 3 in graduated sizes.

The DSP on this card is retired and the message is from the Picked For You stamp set on pg 171 of the AC.
Click here to see the whole Bundle.  It is great and is only available in the month of August and only while supplies last.


Wednesday, August 22, 2018

WEDNESDAY

I had a card ready to post, but my phone keeps spinning and I can't send it to my computer.  I have been trying to clean out the phone, but it doesn't seem to help so I am showcasing a beautiful card created by Claire Daly, an Australian demonstrator.  Thanks, Claire
She is using the Colorful Seasons set, which is on sale now through the end of August or while supplies last.


I have been playing with this Bundle and it is very cool.  

The set includes stamps and thinlits for fall, Christmas, and spring/summer. Available also are the new Watercolor Pencils to add to your set of present pencils. Don't miss out on getting this great Bundle.


Monday, August 20, 2018

MONDAY

I needed a quick card just because time was running out for me to stamp.  I had a kangaroo already stamped and die cut lying on my craft table, so I went with that.  This simple card will be saved and used for a sweet little soon- to- be 2 yr old girl in our church whose parents play in the bell choir with me.  Now I just need to remember where it is and to send it in November!


Supplies used:
Call Me Clover cardstock, Animal Expedition DSP, Stampin' Blends, Stitched Framelits, Petal Burst Embossing Folder, Itty Bitty Greetings, Basic Adhesive-Backed Sequins.

This Bundle can be found on page 27 of the Annual Catalog.  Don't forget the DSP at the bottom of the page.

Friday, August 17, 2018

FUN FOLD FRIDAY

I'm working on a project that my six beach buddies can make in September when we go to the beach for a week.  They don't like to be too challenged, so I thought a notebook with a cover would be perfect.  Here is one I made for a sample.  I may add a different decoration for the front, but this is the basic idea.  


I followed the great directions found on Melissa Stout's website found here so there is no need for me to reinvent the wheel.  Thanks, Melissa!

One thing I did add was to put a pocket on the inside of the folder in which to keep little notes. The dimensions for the pocket are 5 1/2" x 3 3/4", scored at 1/4" and 1/2" on the two short sides and one long side.  Cut out the square pieces on the two corners, burnish your score lines, and fold corners together to form a pocket.  I used Tombow adhesive to hold the corners together.
Put Tombow on the edges of your finished pocket also and attach it to the inside of the cover.

Here is what it looks like inside.

I used retired Kraft DSP that was a little thicker for the base.  Even though Melissa has the dimensions posted on her site, I will put them here for you also.

Cover:  8" x 11.5", scored at 5.5", 6", 6.5"
Front cardstock layer:  4 3/4" x 7 3/4"
Front DSP layer:  4 1/2" x 7 1/2"
Top of Legal Pad strip:  1" x 5"
DSP for inserting in pen: 1" x 3 3/8" (I actually sliced the 1" down a little to fit more easily into the pen.  This can be tricky, but break down the fibers a little with your bone folder, then wrap it around the ink refill tube to get your tubular shape.  You'll get it - be patient.)
Pocket piece:  5.5" x 3 3/4", scored at 1/4" & 1/2" on two short and one long side
Pocket DSP layer:  4 1/4" x 3" 

I purchased my pads at Staples and they come with quite a few in a pack (the ones I used were left over from another project and I don't remember exactly how many were in the pack, but possibly 8 or 10.)

I think I will make one of these for my granddaughter as she heads off to college at the end of the month.  That way maybe she will think of me now and then.  I know I will be thinking of her.


Wednesday, August 15, 2018

WEDNESDAY

I love this adorable card we made at stamp camp this week.  It was inspired by Cindy Fodor, who may have been inspired by someone else.  I took her card and changed it up a little bit with different colors.


This card uses the Animal Outing stamp set, which is also part of the Animal Outing Bundle on pg 27 of the Annual Catalog.  I didn't think I was going to get this set since I don't really have a lot of kid cards to send but I just couldn't resist buying it. It's so cute!  And there is also DSP with matching animal images that you can cut out with your framelits.

The giraffes are actually mirror image stamping.  So I stamped the giraffe on the right first by stamping the image onto my Silicone Craft Mat (pg 213 AC).  And even though it was a little hard to see, because the ink color is not dark, I then took the mat, flipped it over so the ink image was now on the underside and laid it down on top of my white card stock and rubbed so the ink would transfer to the card stock.  In this way I was creating my own stamp by using the mat instead of a block.  Then I stamped the giraffe on the left, in the normal way, to line up with the giraffe that was already on the card stock. Such a cool technique and another way to use your already wonderful Silicone Mat.
Here is a quick video to show you how to do this in person. For my card, as I said, I did the silicone image first because the ink was hard to see and was harder to line up to match up with an already stamped image on the card stock.   
Use only water based inks for this technique.
Try this out and let me know what you think.  

Monday, August 13, 2018

MONDAY

Today's post is one of the cards we will be making at stamp camp this week.

This card uses the Waterfront stamp set, a favorite of many people.  The set was designed by Connie Heisey, a million dollar sales demonstrator and an upline of mine.  
You will find many samples of cards on Pinterest using this set.  It has to go on your wish list if you don't already have it!

Supplies used:
Cardstock:  Balmy Blue, Sea Foam, Crumb Cake, Very Vanilla, Shaded Spruce
Ink: Balmy Blue, Sea Foam, Crumb Cake, Shaded Spruce, Crushed Curry, Night of Navy
Ribbon is retired by blended very well with the Balmy Blue.
Layering Oval Framlits
Classic Label Punch
Woodland Embossing Folder
Itty Bitty Greetings stamp set 


Friday, August 10, 2018

FRIDAY

Don't forget the Color Your Season Special Bundle going on through the end of August while supplies last.  Click here again to see the products.  Here are three cards we made at our Proverbial Stampers meeting using some of the products.

I did not stamp a message on the vellum of the leaf card yet - waiting to see what I might want to use it for.  I did have to fussy cut the bell and the flower that is popped up, but sometimes you just have to bite the bullet.  Such a versatile set for different season of the year.

Wednesday, August 8, 2018

WEDNESDAY

Sorry for the late post.  Golfing, then a pool party and I got behind.  This is a card I created for a Shoebox Swap that the Proverbial Stampers and the Joyful Heart Stampers had last evening.


Supplies used:
Basket Weave Embossing Folder, Healing Hugs Stamp Set, Gorgeous Grape, Granny Apple Green, and Pineapple Punch Ink, Granny Apple card stock, leaf stamp from Painted Harvest with matching Leaf Punch, Gorgeous Grape Mini Striped Ribbon, Basic Rhinestone Jewel.

In the month of September when I am away, I will share a bunch of cards we made or received in the shoebox swap if you don't see them before that. 

Monday, August 6, 2018

MONDAY

It's going to be a busy week for me.  I'm in 3 golf tournaments for worthy causes.  Not sure how well we will do, but it is always fun.

On Friday I will be hosting a Kid's Camp for children ages 5-13.  School will be beginning soon so this is a last chance fun activity before all of that begins again. Kids will be making 4 projects for $10.  Here are the things they will be making.


The kitty cat holds a Hershey Nugget.

Fun card using the My Little Piggy Stamp Set.  Who can resist this cute set?

A cellophane pouch holding 2 pencils, ready for school to begin.  The cellophane bags are a retired item but I had a few left.  The kangaroo from the Animal Outing Stamp set with matching framelits is just to cute not to use.

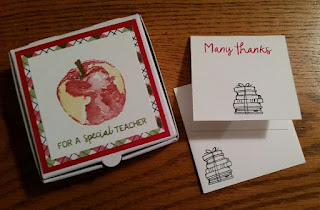
The last item is one of the Mini Pizza Boxes decorated for their new teacher with 4 thank you notes inside.

Sure hope the kids will have fun creating!


Friday, August 3, 2018

FRIDAY

A couple important messages today!
  
BONUS DAYS ARE HERE!
For the month of August you get a $5 coupon (given to you in a code) for each $50 of product that you order.  Just like going to the store and getting $5 off!  Stampin' Up will send you the code when you meet the requirement and in the month of September you can redeem your coupon(s). 
Don't forget to get in on this deal.

The second deal is a special bundle available only while supplies last also available in the month of August.  It is called the Colorful Season Special and includes the Colorful Seasons stamp set, matching dies and new Watercolor Pencils.

Here are some pics of the things you can make:


  Click here to see the products.
It is such a versatile set and you will love it.

Here is a card we made last evening at our Proverbial Stampers meeting using this Bundle.
Colors are Petal Pink and Mint Macaron.  So pretty.
Contact me with any questions you have about this special bundle or about anything else you have on your mind.

Wish me luck at our yard sale for today and Sat.  It is supposed to rain, but I have GOT to get rid of some stuff, so I hope it is not a complete washout.  Of course I will be selling retired products so that I can earn money to buy all the new wonderful products.


Wednesday, August 1, 2018

WEDNESDAY

This month's challenge for the Proverbial Stampers Group was to use three new colors - Balmy Blue, Highland Heather, and Granny Apple Green.
Here is the one I entered.

Pretty self explanatory and very easy.  The stamp set I used is Love What You Do. I also used the Basic Adhesive Baked Sequins from pg 198 of the AC.