Monday, March 25, 2019

MONDAY

Better late than never!

Unfortunately I needed a BUNCH of thinking of You and Sympathy cards last week.  I usually try to make a different card for everyone, but since I needed so many I decided to crank out a bunch that were the same.  Here is what I came up with. I forgot to take a picture of an individual one so here is the whole pack at one time,


Supplies used:
Golden Afternoon Stamp Set
Whisper White, Basic Gray card stock
Momento, Basic Gray, Crumb Cake Ink
Blender Pens
Lemon Lime Twist Ombre Ribbon
Stitched Rectangle Framelits
Gingham DSP


Monday, March 18, 2019

MONDAY

Sorry I missed Friday.  I have some health concerns going on and my mind has been pre-occupied.
Today's card is one we made at our Joyful Hearts  quarterly meeting.  It was designed by Cindy Fodor.  I'm not sure if she cased it from someone else or not.


I love the colors and the clean lines of this card.

Supplies used:
Whisper White, Lemon Lime Twist card stock
Lemon Lime Twist, Black ink
Gingham Gala DSP
Butterfly Gala, Beauty Abounds Stamp Sets
Butterfly duet Punch
Wonderful Floral Framelit Dies
Dimensionals

This card combines several stamp sets to make a beautiful card.
Remember that you have only 13 days left to shop during Sale-a-bration and get your FREE rewards.
Just to let you know that 3 of the Coordination dies are old out - Lily Framelits, Hop Around, and Call Me Cupcake.  They were, obviously, very popular.

There are still some great  FREE items available, so don't wait!

Wednesday, March 13, 2019

WEDNESDAY

Sometimes we get so caught up in the new stamp sets or the Sale-a-bration sets that we forget about some of the tried and true products that we have in the annual catalog.  Today's card is one we made at our Joyful Hearts quarterly meeting this past Saturday.  It was designed by Cindy Fodor.


This card is simple, yet has some different elements to make it pop.  To make the punched end on the green strip, you cut your piece just wide enough that it fits into your punch.  Slide just the end into the punch from the bottom of the punch so that you are not punching out the whole punch design.
Use your Banner Triple Punch to make the cut out end on the message piece.

Supplies used:
Cardstock:  blackberry bliss, mossy meadow, whisper white, sahara sand, vellum (on the inside)
Ink:  blackberry bliss, mossy meadow, soft suede
Rooted in Nature stamp set
Detailed Dragonfly Thinlits
Subtle Embossing Folder
Punches:  Everyday Label, Triple Banner
Copper Trim
Gold Faceted Gems
Dimensionals

Thanks, Cindy, for a great card!
And if you don't have the Rooted in Nature Bundle yet purchase it now and get some Sale-a-bration rewards. #148353  pg 143 Annual Cat 

Monday, March 11, 2019

MONDAY

I know I have been saturating you with tea cards, but I am still creating tea cards to sell so here is another one.

Supplies used:
Flirty Flamingo, Whisper White card stock
Blender Pen dipped in ink to color (Flirty Flamingo, Petal Pink, Pear Pizazz)
retired doilies
retired punches
retired Embossing folder
Botanical Butterfly DSP (SAB item)


Friday, March 8, 2019

FUN FOLD FRIDAY

I was just playing with some of the Painted Seasons products and a different fold for today.  Here is the card I came up with.


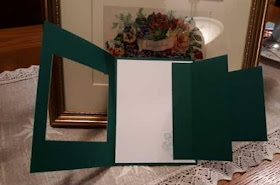
And here is what it looks like when you open it up:


I did not have a square framelit large enough for the front so I needed to cut out a square.  First I cut out a 3 1/4" square out of a piece of copy paper, laid it on the front of the card and traced around it to get the square shape where I wanted it on the front of the card.


Then I used my paper cutter to cut out the square following the traced lines.  Save the piece that you cut out because you will need that.

 Cut out pieces:
One 3 3/4" square of DSP - cut out an inside square of 3 1/2" to make your DSP frame
Inside white layer measuring 4 x 5 1/4.
Green 3 1/4" square (this is what you cut out of the front of the card).
White piece cut out to be 1/16" smaller than the green 3 1/4" cut out square.
One green piece measuring 3 x 5, scored at 1" on the short side.
In the picture below, I have already stamped on the white layered piece and adhered it to the 3 1/4" square.

Adhere the 1" scored section to the inside layer of the card using Tombow, Fast Fuse or Sticky Strip.
Then put Tombow on the back of your green square piece (only on half) and attach it to the large folded piece.  When you do this, close your card so that you can see that the square will line up perfectly with the square hole on the front.


Randomly stamp any image you want on the front of the card around the edge of your cut out square.  Then attach your DSP frame around the square hole. 

Supplies:
Shaded Spruce, Whisper White card stock
Shaded Spruce, Pool Party, Petal Pink, Lemon Lime Twist ink
Painted Seasons DSP, framelits, and stamp set

This card is not hard to make and goes together quickly.  I actually adapted it from a swap card I had received that had a larger inside piece with more folds.  I decided this would work, use less paper, an give me more space on the inside to put my message.




Wednesday, March 6, 2019

WEDNESDAY

I have been making some cards to sell in a local Tea House so I have another tea card for you.


I really love this set - Tea Together.  You can order the stamp set and get the matching framelits as a Sale-a-bration FREEBIE.

Supplies used:
Tea Together Stamp Set
Tea Time Framelits (FREE with a $100 order)
Layered Leaves Embossing Folder #143704
Petal Promenade DSP #146913
Stampin' Blends


Monday, March 4, 2019

MONDAY

Welcome March!
We are having a snow storm here where I live.  Supposed to be 4-8 inches by the morning.  We'll see.  March always seems to be good for snow, just when you are ready for spring to get here.

Along with March comes a Third Release of Sale-a-bration Products from Stampin' Up for our last month of FREEBIES.

Check out the link to the right of the blog so you can see the new items plus all the "old" items that are still available.  And don't forget the Coordination products.  In love!

Today's card is one using the Country Floral Embossing Folder that is FREE with the Second SAB release.  It coordinates with the Painted Garden stamp set and DSP.

I combined the folder with the Tea Together Stamp Set and Framelits.  I apologize that my pics do not seem very crisp and clear.  I'm not sure what is going on, but I can't get them to show any better.  I used the Stampin' Blends to color the images on the folder piece.  The white cardstock really soaks up the ink from the Blends.  Tomorrow I am going to try and use watercolor paper and see if there is a difference.  It looks good, but the lighter colors do work a little better because the cardstock does not get so saturated.

Supplies used:
Pool Party, Calypso Coral, Mossy Meadow, Whisper White cardstock
Stampin' Blends
White Thread left over from a Paper Pumpkin Kit
Subtle and Country Floral Embossing Folders


Friday, March 1, 2019

TECHNIQUE FRIDAY (sort of)

I just wanted to touch base with all of you about Paper Pumpkin again.  One thing to remember is that when you get your kit, the stamp set is great to keep and use for other projects.  The February Kit was great and I loved the little cup stamp so I used it for something else even before I put the kit together.  (I'm going to be doing that this Sat at a scrapbook/vendor event for Jr Diabetes).


The kit is all about succulents. Watch the video to see what you would have received if you were a Paper Pumpkin customer.
As you noticed in the video, when you place your order for the March kit by March 10th, you will be receiving an extra stamp set in your kit to celebrate the 6th birthday of Paper Pumpkin.
AND during Sale-a-bration, you will get Sale-a-bration rewards for a
3 month - 1 FREE SAB item
6 month - 2 FREE SAB items
12 month - 4 SAB items PLUS 20% stampin' rewards PLUS $25 extra reward dollars if you add $50 dollars to your subscription.  WOW!  Now THAT'S a deal.  Don't miss out.

Also, beginning today there are some new coordination items available that go with some of the Sale-a-bration items.  Here is a look at that:

The gray items are the coordination items available for purchase and the white items are the SAB products that those gray items coordinate with.  Visit my website for prices and items #.